3 min read
Dec 27, 2023
Previously
How to Build an Online Database APP by Python, PySide6 and Google Sheets (12): View Settings
Previously
ihenrywu.medium.com
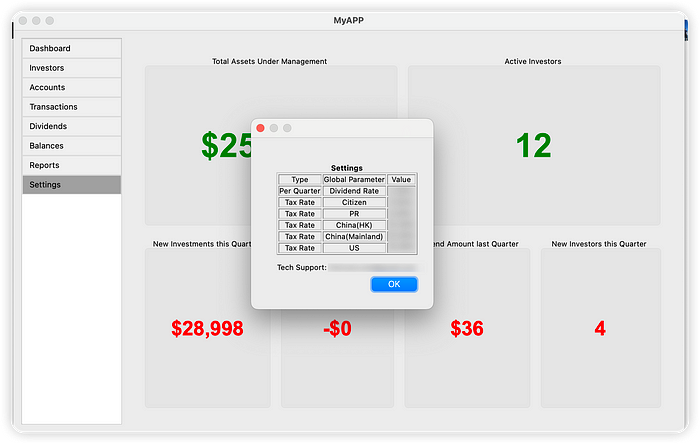
This article is about how to “View Settings” in the App:

Call function in the Main Window
- Clears the existing content in the main window.
- Creates an instance of
SettingsDialog, passinggoogle_sheets_clientas a parameter. - Converts the content of the
settingsTableinSettingsDialogto HTML format usingtable_to_html. - Displays the HTML content in a message box for user viewing.
    def display_settings_form(self):
        self.clear_content()

        # Create a SettingsDialog
        settings_dialog = SettingsDialog(self.google_sheets_client)

        # Get the table content as HTML
        table_html = SettingsDialog.table_to_html(settings_dialog.settingsTable)

        # Create a QMessageBox to display the HTML content
        message_box = QMessageBox(self)

        # Set the informative text with center alignment
        message_box.setInformativeText(table_html)

        # Show the message box
        message_box.exec()
Create View Settings Class
__init__: Initializes the dialog, sets the window title, and creates a layout.- A table (
settingsTable) is created to display settings data, with editing disabled.
class SettingsDialog(QDialog):
    def __init__(self, google_sheets_client):
        super().__init__()

        self.setWindowTitle("Settings")
        self.google_sheets_client = google_sheets_client

        # Create a QVBoxLayout for the dialog
        layout = QVBoxLayout(self)

        # Create a table for settings
        self.settingsTable = QTableWidget()
        self.settingsTable.setEditTriggers(QTableWidget.NoEditTriggers)  # Set the table as read-only

        layout.addWidget(self.settingsTable)

        # Load data from the sheet
        self.loadData()

        # Add a note at the bottom
        note_label = QLabel("Log in to Google Sheets to change the settings.")
        layout.addWidget(note_label)
loadData: Loads settings data from a specified worksheet (“99_Settings”) in Google Sheets, sets the table’s column and row count, and populates it with the fetched data.- A label is added as a note at the bottom of the dialog, informing users to log in to Google Sheets to change settings.
    def loadData(self):
        # Fetch data from Google Sheets
        worksheet = self.google_sheets_client.open_spreadsheet(GOOGLESHEET_ID).worksheet("99_Settings")
        settingsData = worksheet.get_all_values()

        if not settingsData:
            return

        # Extract column names from the first row
        column_names = settingsData[0]

        # Set the number of columns and rows in the table
        self.settingsTable.setColumnCount(len(column_names))
        self.settingsTable.setRowCount(len(settingsData) - 1)  # Exclude the header row

        # Set the column names as horizontal header labels
        self.settingsTable.setHorizontalHeaderLabels(column_names)

        # Populate the table with data
        for row_idx, row_data in enumerate(settingsData[0:]):  # Exclude the header row
            for col_idx, cell_data in enumerate(row_data):
                item = QTableWidgetItem(cell_data)
                item.setFlags(item.flags() ^ Qt.ItemIsEditable)  # Make the cell uneditable
                self.settingsTable.setItem(row_idx, col_idx, item)
- Converts the content of a
QTableWidget(the settings table) into an HTML table format. - Additional HTML elements like paragraphs for notes or contact information are added for context and clarity.
    def table_to_html(table_widget):
        # Create an HTML table from the QTableWidget content
        note_html_0 = "<p style='text-align: center;'><b>Settings<></p>"
        note_html_1 = "<p style='text-align: center;'></p>"
        html = "<table border='1'>"
        for row in range(table_widget.rowCount()):
            html += "<tr>"
            for col in range(table_widget.columnCount()):
                item = table_widget.item(row, col)
                if item is not None:
                    html += f"<td style='text-align: center;'>{item.text()}</td>"
                else:
                    html += "<td style='text-align: center;'></td>"
            html += "</tr>"
        html += "</table>"
        note_html_2 = f"<p style='text-align: center;'>Tech Support: {EMAIL_HENRY}</p>"
        html = note_html_0 + html + note_html_1 + note_html_2

        return html
Next Step:
How to Build an Online Database APP by Python, PySide6 and Google Sheets (13): Dashboard
Previously
ihenrywu.medium.com
Database
Python
Pyside6
Google Sheets
GUI